What do the symbols on my Philips Nose Trimmer mean?
Published on 24 June 2026
If you are wondering what the various symbols on your Philips Nose Trimmer mean, please read further for a detailed explanation.
Turning the nose trimmer on/off
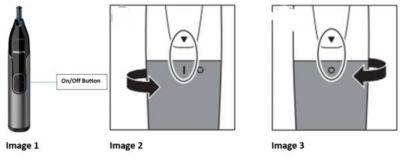
Some nose trimmer models (Image 1) come with an on/off switch button located directly on the handle. Slide the button up to turn the trimmer on, slide the button down to turn it off.
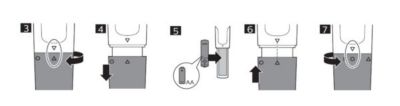
Other models have an arrow indicator located on the handle.
To switch the trimmer on, turn the battery compartment cover counterclockwise until the setting indicator (V) aligns with the “on” indication (I) (Image 2).
To switch the trimmer off, turn the battery compartment cover clockwise until the setting indicator (V) aligns with the off indication (O) (Image 3).
Battery compartment in the handle
Some nose trimmers operate on disposable batteries. Before attempting to insert or remove the batteries for your nose trimmer, make sure your hands and the device are dry. To replace the batteries, the battery compartment can easily be opened by aligning the indications of the symbols as instructed below.
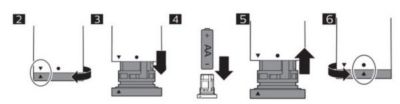
1. To remove the battery compartment cover, turn it clockwise until the setting indicator (V) points to the 'unlocked' indication (Ʌ) (Fig. 3).
2. Pull the battery compartment cover off the handle (Fig. 4).
3. Put the battery in the battery compartment (Fig. 5). Make sure the + and - poles of the battery point in the right direction.
4. Slide the battery compartment cover back onto the handle (Fig. 6).
5. Turn the battery compartment cover counterclockwise until the setting indicator (V) points to the 'off’ indication (O) (Fig. 7).
Battery compartment in bottom of handle
Some nose trimmers operate on disposable batteries. Make sure your hands and appliance are dry when you insert the battery. To replace the batteries, the battery compartment can easily be opened by aligning the indications of the symbols as instructed below.
1. To remove the battery compartment cover, turn it until the setting indicator (V) points to the‚ ‘unlocked‘ indication (Ʌ) (Fig. 2).
2. Pull the battery compartment cover off the handle (Fig. 3).
3. Put the battery in the battery compartment (Fig. 4). Make sure the + and - poles of the battery point in the right direction.
4. Slide the battery compartment cover back onto the handle (Fig. 5).
5. Turn the battery compartment cover until the setting indicator (V) points to the ‘locked’ indication (O) (Fig. 6).
Nose trimmer attachments
Philips Nose trimmers come with a nose trimmer, rotary trimmer and sometimes also a detail trimmer head. These can easily be removed and attached by aligning the indications of the symbols as described below.
• To take off the nose trimmer or detail trimmer head, firmly grip the handle of your device, hold the attachment, and turn it counterclockwise, until the “Ʌ” triangle indications on the handle and the head are aligned. Then just pull the attachment off.
• To attach the nose trimmer or trimming head, place it on the handle aligning both triangle “Ʌ” indications. Then turn it clockwise until the indicator triangle “Ʌ” and line “|” indication on the body and attachment are aligned and the attachment is fixed.
